» Unit 2: Book scanning
Technologically the most demanding part of the scanning process is creating images of the pages of a printed book. It’s a process that is very different form scanner design to scanner design, from camera to camera. In principle, you want to capture pages so that as large area of pages is captured as possible, that pages are equidistant from the camera or capturing surface, and that there’s the least variation from page to page. To achieve this on a flatbed or photocopier, you have to principally press the book as wide open against the capturing surface as possible. With an overhead camera setup, this is a more delicate process. Therefore, here we will focus strictly on the process with the MOTW scanner.
Operating the MOTW scanner
1. Before you start
Better and more consistent photographs lead to a more optimized and faster post-processing and a higher quality of the resulting e-book. In order to guarantee the quality of images, before you start it is necessary to set up the cameras properly and prepare the printed book for scanning.
a) Loosening the book
Depending on the type and quality of binding, some books tend to be too resistant to opening wide enough to reveal the inner margin under the pressure of the Plexiglas plate. It is thus sometimes necessary to “break in” the book before starting in order to loosen the binding. The best way is to open it as wide as possible in multiple places in the book. This can be done against the table edge if the book is more rigid than usual. (Warning – “breaking in” might create irreversible creasing of the spine or lead to some pages breaking loose. If your book is fragile, skip this step.)
b) Switch on the scanner
You start the scanner by pressing the main switch or plugging the power cable into the scanner. This will also turn on the overhead LED lights.
c) Setting up the cameras
Place the cameras onto tripods. You need to move the lever on the tripod’s head to allow the tripod plate screwed to the bottom of the camera to slide into its place. Secure the lock by turning the lever all the way back. If the automatic chargers for the camera are provided, open the battery lid on the bottom of the camera and plug the automatic charger. Close the lid. Switch on the cameras using the lever on the top right side of the camera’s body and place it into the aperture priority (Av) mode on the mode dial above the lever (see Illustration 3). Use the main dial just above the shutter button on the front side of the camera to set the aperture value to F8.0.
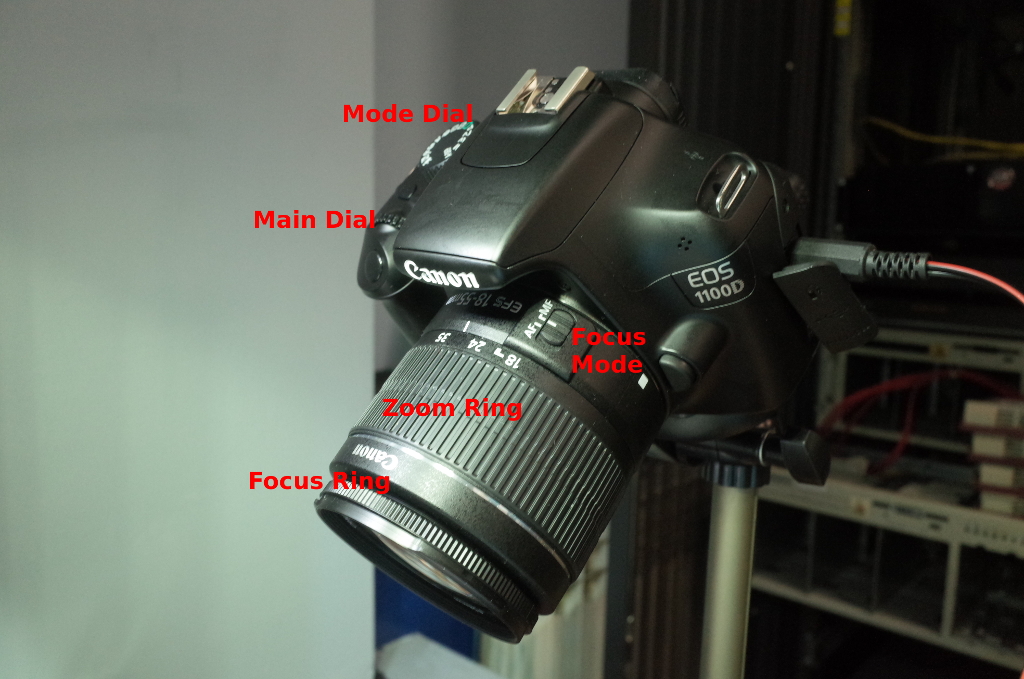
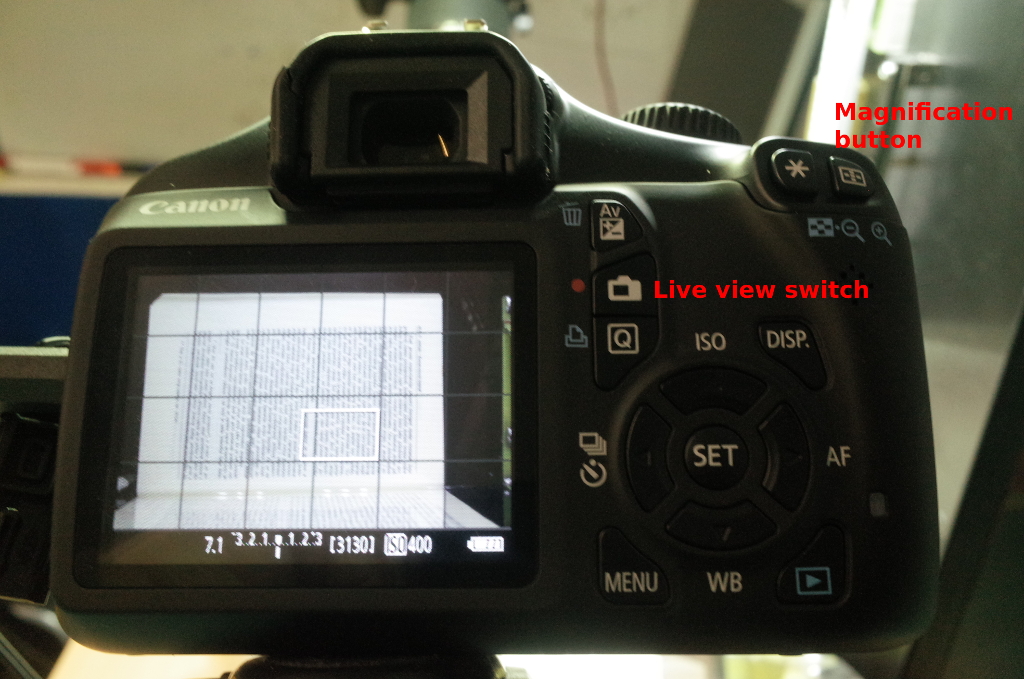
On the lens, turn the focus mode switch to manual (MF), turn the large zoom ring to set the value exactly midway between 24 and 35 mm (see Illustration 3). Focal length should be on both cameras set to same the value. Use dial on the ring and the live-view screen to ascertain that this is so. To focus each camera, open a book on the cradle, lower the Plexiglas plate by holding the big button on the controller, and turn on the live view on camera LCD by pressing the live view switch (see Illustration 4). Now press the magnification button twice and use the focus ring on the front of the lens to get a clear image view.
d) Connecting the cameras
Now connect the cameras to the remote shutter trigger cables that can be found lying on each side of the scanner. They need to be plugged into a small round port hidden behind a protective rubber cover on the left side of the cameras.
e) Placing the book into the cradle and double-checking the cameras
Open the book in the middle and place it on the cradle. Hold pressed the large button on the controller to lower the Plexiglas plate without triggering the cameras. Move the cradle so that the V-shaped plate fits into with the middle of the book. Turn on the live-view on the cameras’ LED to see if the pages fit into the image and if the cameras are positioned parallel to the page.
f) Double-check storage cards and batteries
It is important that both storage cards on cameras are empty before starting the scanning in order not to mess up the page sequence when merging photos from the left and the right camera in the post-processing. To double-check, press play button on cameras and erase if there any remaining photos from the previous scan – this you do by pressing the menu button, selecting the fifth menu from the left and then select ‘Erase Images’ -> ‘All images on card’ -> ‘OK’.
If no automatic chargers are provided, double-check on the information screen that batteries are charged. They should be fully charged before starting with the scanning of a new book.
g) Turn off the light in the room
Lighting conditions during scanning should be as constant as possible, to reduce glare and achieve maximum quality remove any source of light that might reflect off the Plexiglas plate. Preferably turn off the light in the room or isolate the scanner with the black cloth screen.
2. Photographing a book
Now you are ready to start scanning. Place the book closed in the cradle and lower the platen by holding the large button on the controller pressed (see Illustration 2). Adjust the position of the cradle and lift the Plexiglas plate by pressing the large button again. To scan you can now either use the small button on the controller to lower the plate, adjust and then press it again to trigger the cameras and lift the plate. Or, you can just make a short press on the large button to do it in one go.
ATTENTION: When the cameras are triggered, the shutter sound has to be heard coming from both cameras. If one camera is not working, it’s best to reconnect both cameras (see Section 0), make sure the batteries are charged or adapters are connected, erase all images and restart. A mistake made in the photographing requires a lot of work to correct in the post-processing, so it’s much quicker to repeat the photographing process rather than correct.
If you made a mistake while flipping pages, or any other mistake, go back and scan from the page you missed or incorrectly scanned. Note down the page where the error occurred and in the post-processing the redundant images will be removed.
ADVICE: The MOTW scanner has a digital counter. By turning the dial forward and backward, you can set it to tell you what page you should be scanning next. This should help you avoid missing a page due to a distraction.
While scanning, move the cradle a bit to the left from time to time, making sure that the tip of V-shaped Plexiglas plate is aligned with the center of the book and the inner margin is exposed enough.