» Unit 1: Introduction to book digitization: From a printed book to an e-book
1. Initial considerations when deciding on a scanning setup
Book scanning tends to be a complex and time-demanding process. Many factors can go wrong or produce results of varying quality from book to book or page to page, requiring experience or technical skill to resolve issues that occur. Most of us can manage to scan with a common flatbed scanner, but it can be an excruciatingly slow process to digitize a book. If you have a more sophisticated scanner, such as the hackerspace scanner or our Memory of the World scanner, cameras can fail to trigger, components to communicate, files can get corrupted in the transfer, storage card doesn’t get purged, focus fails to lock, lighting conditions change. There are trade-offs between the automation that is prone to instability and the robustness that is prone to become time-consuming.
Your initial choice of book scanning setup will have to take these trade-offs into consideration. If you’re doing scanning yourself, you’ll be the best judge of your skills and time. But, if you’re setting up a collective scanning effort, then your scanning community makes a big difference. If scanning is confined to a hacklab, you won’t be risking much if technological sophistication and integration fail to function smoothly. If you’re aiming at a broad community of users, with varying levels of technological skill and time, you want to create as much time-saving automation as possible while maintaining maximum stability. Furthermore, if the time of individual members of your scanning community can contribute is limited, you might also want to divide some of the tasks between users and their different skill levels.
This tutorial breaks down the process of digitization into a general description of a number of steps in the workflow leading from a printed book to an e-book, each of which can be in a concrete situation addressed in various manners - depending on the scanning equipment, software, technical support and user skill level that are available to your book scanning project. Several of those steps can be handled by a single piece of equipment or software, or you might need to use a number of them - your mileage will vary. Therefore, this tutorial will try to indicate the design choices you have in the process of planning your workflow and should help you make decisions on what design is best suited for you situation.
2. Introducing book scanner designs
The book scanning starts with the capturing of digital image files on the scanning equipment. There are three principal types of book scanner designs:
- flatbed scanner
- single-camera overhead scanner
- two-camera overhead scanner
Conventional flatbed scanners are widely available. However, given that they require the book to be spread wide open and pressed down with the platen in order to break the resistance of the book-binding and expose sufficiently the inner margin of the text, it is the most destructive approach for the book, imprecise and slow. These days photocopiers work as scanners too, producing solid scans while being faster than conventional flatbeds. Flatbeds and photocopiers are superior in capturing glossy full-color images to other scanner designs. Both are widely available and probably your first port of call.
However, if you plan to scan many books and/or want to prevent breaking of spines, you have to look to other options. Therefore, book scanning projects across the globe have taken to custom-designing setups or scanner rigs that are less destructive and better suited for fast turning and capturing of pages. Designs abound. Most include:
- one or two digital photo cameras of lesser or higher quality to capture the pages,
- transparent V-shaped glass or Plexiglas plate to press the open book against a V-shape cradle or vice-versa, and
- a light source.
The go-to web resource to help you make an informed decision is the DIY book scanning community. Designs abound. Memory of the World design can be found on the projects website. If you’re working at a large institution with a huge collection to digitize, you might consider entering a collaboration with the Internet Archive. The book scanners with a single camera are substantially cheaper, but come with an added difficulty of de-warping the distorted page images due to the angle that pages are photographed at, which can sometimes be difficult to correct in the post-processing. Hence, in this introductory chapter we’ll focus on two camera designs where the camera lens stands relatively parallel to the page. However, with a bit of adaptation, these instructions can be used to work with any other setup.
3. Memory of the World scanner
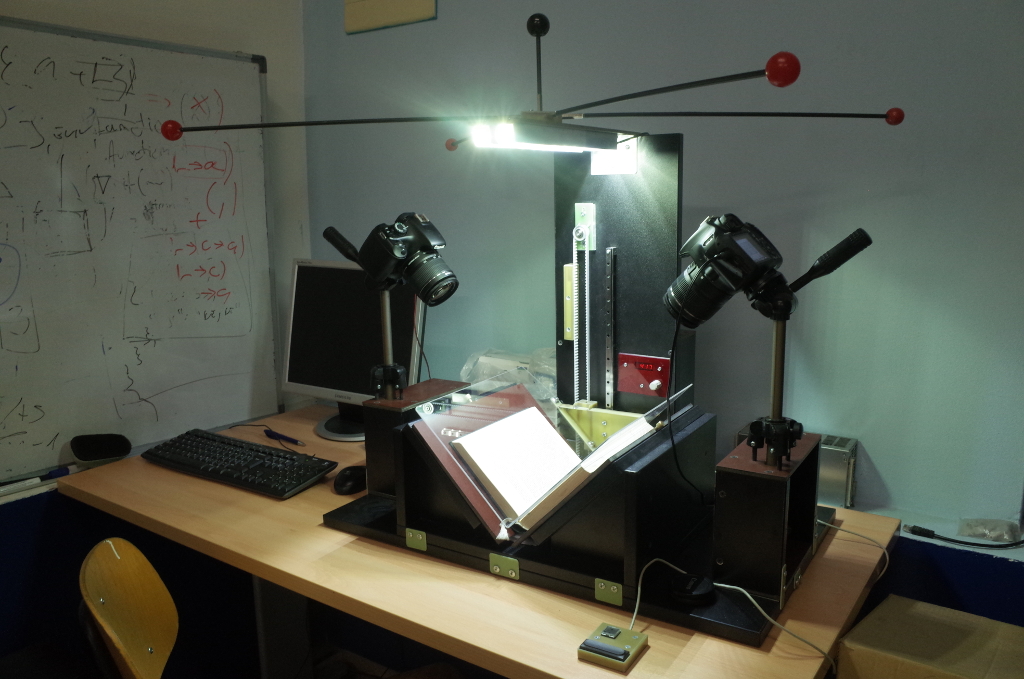
Practical examples in this tutorials are is the scanner built for the Memory of the World (formerly, Public Library) project (see Illustration 1). The Memory of the World (MOTW) scanner was designed and built by the engineer Voja Antonić with the immediate use by a wide community with different levels of skills in mind. Hence, the principal consideration in designing the MOTW scanner was less sophistication and more robustness, facility of use and distributed process of digitization. The circuit-board designs can be found on the MOTW website. The current iterations are using two Canon 1300 D cameras with the kit lens Canon EF-S 18-55mm 1:3.5-5.6 IS. Cameras power adapters that can be cheaply obtained from the internet. These slide into cameras in lieu of a battery to provide a constant power supply.

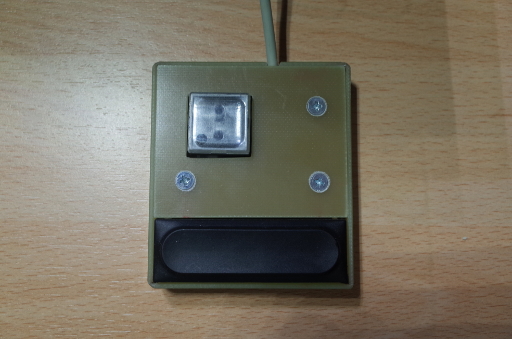
The scanner operates by automatically lowering the Plexiglas plate, illuminating the page and then triggering camera shutters. The turning of pages and the adjustments of the V-shaped cradle holding the book are manual. The scanner is operated by a two-button controller (see Illustration 2). The upper, smaller button breaks the capture process in two steps: the first click lowers the Plexiglas plate, increases the light level and allows you to adjust the book or the cradle, the second click triggers the cameras and lifts the platen.
The lower button has two modes. A quick click will execute the whole capture process in one go. But if you hold it pressed longer, it will lower the platen, allowing you to adjust the book and the cradle, and lift it without triggering cameras when you press again.

4. More on this tutorial: steps in the book scanning process
The book scanning process in general can be broken down in six steps, each of which will be dealt with in a separate lesson in this tutorial:
I. Capturing images of a printed book II. Getting the image files ready for post-processing III. Transformation of source images into .tiffs IV. Optical character recognition V. Creating a finalized e-book file VI. Cataloging and sharing the e-book
5. A step by step manual for MOTW scanner
This manual is primarily meant to provide a detailed description and step-by-step instructions for an actual book scanning setup – based on the Voja Antonić’s scanner design described above. This is a two-camera overhead scanner, currently equipped with two Canon 1100 D cameras with EF-S 18-55mm 1:3.5-5.6 IS kit lens. It can scan books of up to A4 page size. We have built around a dozen of such scanners that can be found from Zagreb to Berlin, from Calafou to Ramallah.
The post-processing in this setup is based on a semi-automated transfer of files to a GNU/Linux personal computer and on the use of free software for image editing, optical character recognition and finalization of an e-book file. The workflow was initially developed for the HAIP festival in Ljubljana in 2011 and perfected later at MaMa in Zagreb and Leuphana University in Lüneburg.
The MOTW scanning process proceeds in following discrete steps:
- creating digital images of pages of a book,
- manual transfer of image files to the computer for post-processing,
- automated renaming of files, ordering of even and odd pages, rotation of images and upload to a cloud storage,
- manual transformation of source images into .tiff files in ScanTailor
- manual optical character recognition and creation of PDF files in gscan2pdf
The detailed description of the Public Library scanning process follows in the next lessons.